
Table of Contents
- How to Enhance Your Images: 5 Tips
- How to Improve Image Clarity
- Key Takeaways
- Conclusion
- FAQs
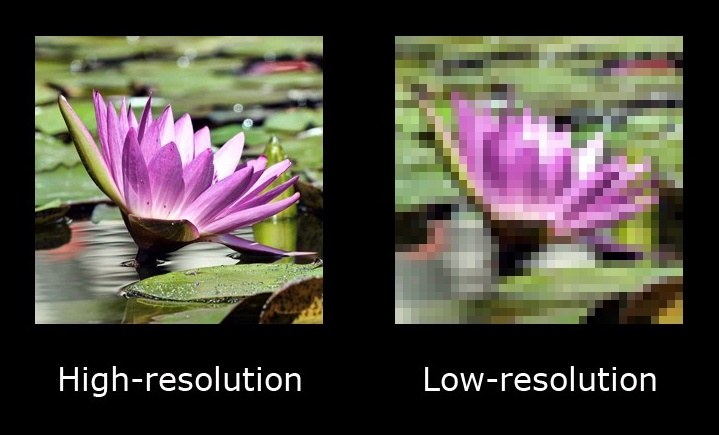
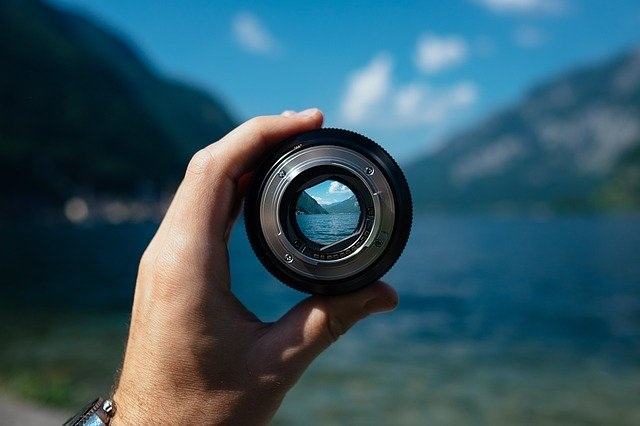
Image quality or IQ refers to the accuracy and aesthetic sense of a photograph, including all the different aspects of a picture such as brightness, geometry, resolution, etc. All image optimization tips that you find online include methods to improve image quality. A high-quality image is pleasing to the eye and adds credibility to your abilities. Even without expensive equipment, you can produce a high-quality image with appropriate camera settings and proper editing.
While many photographers like to emphasize the emotional aspects of an image rather than its technical quality, knowing how to enhance images using the given points can help you become a better photographer.

How to Enhance Your Images: 5 Tips
Capturing a vivid and striking photo is the ideal goal of many photographers. Here are some simple photography tips that you can use to experiment and ensure that your photos turn out the way you want them to.
You can also learn how to improve image clarity from these tips.
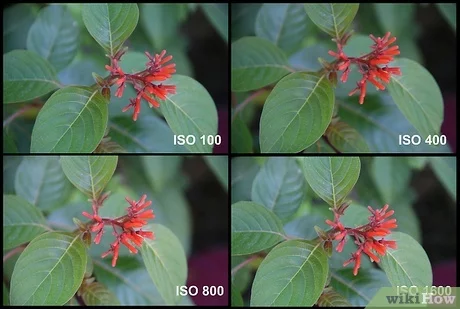
1. Reduce ISO
ISO helps you understand the sensitivity of your camera to light. If you increase the ISO, your camera will let in more light. However, this will also increase noise or unwanted digital artifacts, which is why most image optimization tips stress the importance of setting proper ISO standards.
Generally, it is believed that a lower ISO level helps take better quality images. Higher levels of ISO will make your images susceptible to digital noise and grain, making them less sharp.
You should experiment with your camera and find out the highest ISO settings you are willing to use for your images. Different ranges of ISO settings exist in cameras based on their models and other specifications. An example of ISO values available is ISO 100, ISO 200, ISO 400, etc. The higher you set your ISO value, the brighter and grainier your images will appear. So, how to enhance images? Set an appropriate ISO!
The lowest ISO value on a camera is called the base ISO; you should try to stick to this level for good images in most settings. In most cameras, this is ISO 100 or 200. However, don’t forget that ISO mainly deals with light. Using a high ISO might give you better results when the surroundings are dark.
2. Increase the aperture
Aperture is the gap through which light enters a camera lens. It can be controlled from the settings and is denoted by an f-stop scale, for example, f/1.4, f/2.8, etc. Higher numbers such as f/8 have a smaller aperture size and allow less excess light to enter the lens.
Additionally, the aperture will also help you focus on the foreground to add depth. Smaller aperture sizes will allow everything to be in focus compared to greater aperture sizes.
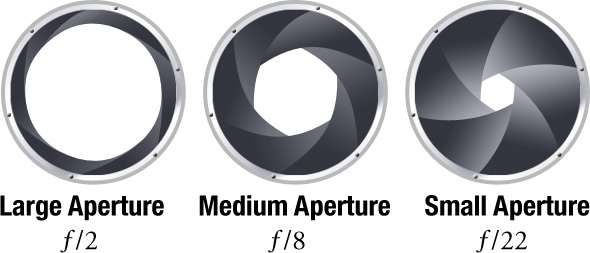
You might be considering using the lowest possible aperture after following popular image optimization tips. But that doesn’t necessarily help. At the low aperture values of f/22 or f/16, you may notice diffraction in your image, making them less sharp. Diffraction is the visible bending of waves around an object due to the laws of physics.
While some expensive cameras and lenses might be able to give good results with extreme aperture values, most cameras have a sweet spot somewhere in the middle. If you cannot invest in a premium lens that can work with an extreme value, try to find a comfortable mid-range aperture value for your lens. You can begin by shooting at a mid aperture value between f/3.5 to f/8. This will produce sharp images while focusing on your subject.
Although aperture affects photos, there is no hard and fast rule about the values you should use. Be mindful of your image’s sharpness or lack thereof but have fun experimenting with it.
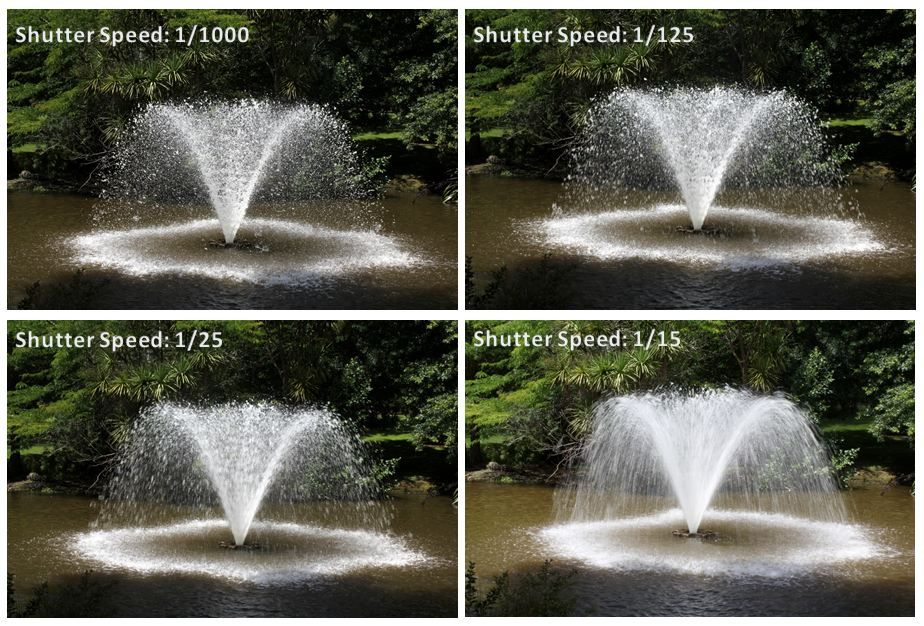
3. Increase shutter speed; use a tripod if necessary.
Shutter speed of exposure time refers to the amount of time light is allowed to enter a lens. This value is represented by different fractions of a second such as 1/500 or 1/250. Fractions with larger denominators would allow less light than fractions with smaller denominators. For example, an image with the shutter speed of 1/500 would allow less light than an image taken at the shutter speed of 1/250.
Any unexpected movement can get registered when using a long shutter speed in a handheld camera, leading to blurry photos. Our bodies are prone to movement, but even the tiniest movement paired with a long shutter speed can be a recipe for disaster.
The best way to avoid the problem of camera shake is to use a sturdy tripod while taking photos at a slow shutter speed. If you find it challenging to invest in a bulky and expensive tripod, consider mini tripods, which are smaller and cheaper yet sturdy. If you can not buy a tripod, find other sturdy spots such as a desk, a pile of books, or a chair.
Alternatively, you can use a shorter shutter speed to avoid minor movements affecting your photos.
4. Understand focus
To avoid blurry photos, the focus should be the next priority. While there is no need for manual focus at all times, understanding how the focus level affects your photos can widen your range of creative possibilities.
First, find out the possible focal points using a viewfinder. These are the points that the autofocus is likely to catch. You should consider different aspects of your lens, such as the threshold of light it can take, the ability to autofocus, etc. Try to place your object in the center focus point to ensure its sharpness. Focus can change from the smallest of movements; therefore, being conscious of how you stand or hold your camera can make the process easier.
The best approach to understanding the proper focus is experimenting with your device. An area that stresses focus in a fast-paced environment is sports photography. Apart from experimenting, understanding the basics behind the autofocus setting can help you take better photos.
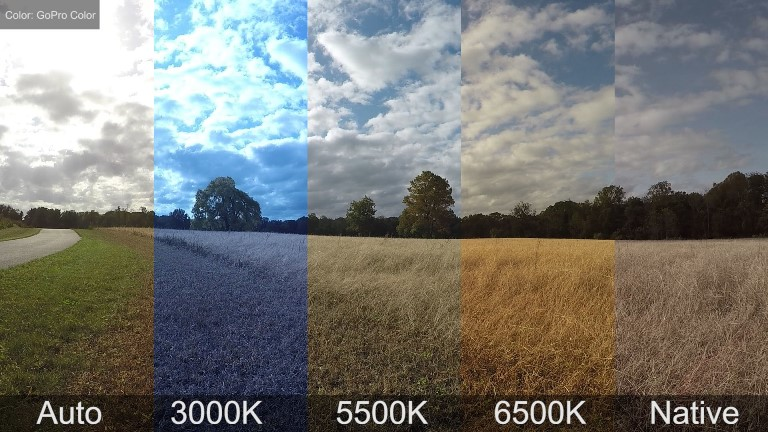
5. Correct white balance
If you want to learn how to enhance the image quality, it is essential to understand what “white balance” is. White balance or color balance, like its name suggests, stabilizes the overall intensity of colors in an image. Adjust the white balance to make your images more vivid and striking so that the neutral colors are correctly visible.
Different types of artificial light sources have varying color temperatures. To illustrate this, compare the warm yellowish color emitted by a candle with the dark blue color visible due to a heavily overcast sky. Similarly, environmental settings such as shadows or clouds can also change the available lighting. This can affect the intensity of colors in your image, making them dull or vibrant.
You can adjust the white balance in your camera while taking a picture or later while editing an image. If you wish to edit the color balance manually, it is recommended to take photos in a RAW format and not JPEG. A proper white balance level might not be available in the auto mode, so you can try experimenting with the available settings in manual mode.
How to Improve Image Clarity
ISO, aperture, and shutter speed are the three pillars of photography. Simply understanding these three ideas and experimenting with them can allow you to become a better photographer. Additionally, paying attention to other environmental cues can help you choose proper settings while taking a picture.
Key Takeaways
- Image quality is a technical indicator of aesthetic value in an image. Ideally, a high-quality image has a good balance of all aspects of photography.
- Camera ISO affects exposure; it can make your image dull or bright based on the lighting available. Using unnecessarily high ISO is not recommended since it can make your images grainy.
- Aperture affects the light that enters a lens. It can add more focus and depth to your image. Using a smaller aperture will allow you to focus on both background and foreground, whereas using a greater aperture will allow you to focus on the foreground. Using too low an aperture can distort your images due to diffraction.
- Shutter speed affects the amount of light entering while taking an image. Although a long shutter speed requires the camera to be stable for longer, this can lead to blurry images due to camera shakes.
- A tripod can be used to avoid camera shake while using a longer shutter speed. Alternatively, other makeshift sturdy spots can be arranged for the camera.
- Improve focus on your camera by using the autofocus mode or manual focus mode. Use a viewfinder to look at potential focus points. Try to keep the subject in the middle for better focus.
- Correct white balance or color balance by being mindful of how environmental lighting affects colors in your image. By carefully adjusting the neutral colors, you can make an image more striking. If you don’t want to color correct manually while taking a photo, you can later edit it in the RAW format.
Conclusion
Image quality is the aesthetic impression of an image that includes its overall photographic values. You can become a better photographer by understanding how ISO, aperture, and shutter speed work in tandem. Additionally, you can learn how to enhance the image quality by paying attention to other important values such as white balance, lighting, stability, and focus.
FAQs
ISO refers to a camera’s sensitivity to light. ISO is one of the crucial aspects of photography and can affect the amount of light exposure in an image.
While ISO 100 might be insufficient for low light photography, ISO 400 or 800 should get the job done. Additionally, consider using slow shutter speed and wider aperture instead of simply increasing ISO to take better images.
White balance is used to adjust colors in relation to the light source. An easy way to ascertain this includes adjusting the camera so that white objects appear white in the image. Different types of light sources such as sunlight, fluorescent lights, neon lights can add unnecessary tint to objects in the image.
AF (autofocus) mode is when your camera finds a spot to focus on its own, whereas MF (manual focus) mode is when the photographer manually chooses a spot to focus on. MF mode can be used when you require a specific focal point for your images.
Aperture can help you add dimension by controlling the depth of objects in your images. You can have a sharp one-dimensional image at one extreme, to an image with a slight depth by focusing on the foreground at the other extreme value of aperture.
Latest Blogs
Explore how Google’s 2025 AI search updates triggered ranking chaos. Learn actionable strategies to adapt your SEO for AI Overviews, zero-click searches, and SERP volatility. Stay ahead now.
Learn how to rank on AI search engines like ChatGPT, Perplexity, and Gemini by optimizing your content for authority, structure, and relevance. Stay ahead in AI-driven search with this strategic guide.
Explore the best healthcare SEO services for your medical practice. Improve online visibility and effectively reach more patients in need of your services.
Get your hands on the latest news!

Similar Posts

Content Analytics
8 mins read
Google I/O 2025: AI Search Shake-Up & Ranking Volatility

Artificial Intelligence
5 mins read
Top AI Blog Writing Tools for Website Monetization

Blogging
10 mins read